

Sig Hog Bipe
The Hog Bipe is one of my all time favorite planes. Its wide flight envelope makes for real fun to fly.
_________
More pictures
Hog Bipe Page 2 | Hog Bipe Page 3 | Hog Bipe Page 4 | Hog Bipe Page 5 | Hog Bipe Page 6 | Hog Bipe Page 7

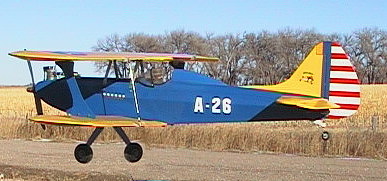
Eric Kler's SIG Hog Bipe
- Coverered in 21st century fabric
Powered by a Saito .91 four stroke
Weight - 7.6 pounds.
_________
REVISED
with engine mounted at 90 degrees and a cowl!


Woody as pilot
My personal favorite at FUBAR Hill
Ivo Amuli's Classy version of the Hog Bipe


The wings and
stab/elevators were covered in Cub Yellow 21st Century Fabric.
The fuse was covered with Super Coverite,
given 2 coats of dope and painted in silver 21st Century paint.
Power is from a .70 OS Surpass and the wheels are Sullivan 3 3/8" Cub style wheels.
![]() Ivo did a full review of this plane on
R/C Flight Unlimited
Ivo did a full review of this plane on
R/C Flight Unlimited ![]()
Another Hog Bipe owned by Brent Robert, formerly of from Mike "Gator" Smith's


______
After a mishap it now has been resurrected by Brent into this nice rebuild


OS 91 surpass w/ 14x6 APC (will hover it)
pilot is Capt. Jammers
Flying from Middle Point Radio Control Flyer's field in
Murfreesboro, TN.
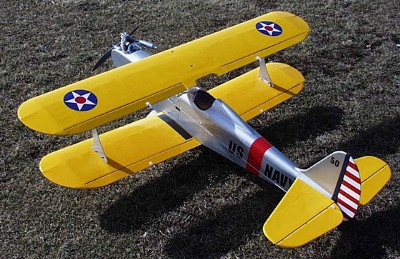
Box top Classic from Mike Harris


It is powered by
an OS.61SF and uses a Futaba 8UAF radio.
Mike says, "It is my third plane. I really
enjoy flying this baby as being relatively
new to the R/C scene it is not too tough to fly and lands real
nice,
plus it looks great in the air with those two wings!"
Jim Underwoods Hog Bipe

Jim writes, "It is
the first plane that I ever built.
It is a great flyer, and Great plane to build and a blast to
fly."
Originally had a Super Tiger 75 2 stroke up front, it now has an
OS 91 on it.
With Kenny from South Park as the pilot. It can be seen in the
skies over North Carolina.
Ron Williams's Sharp Hog Bipe


It's covered in monokote and
powered with an O.S.91
Chicago, Illinois
Mike Bogh's Clipped wing Hog Bipe


Modified with by leaving off the round wing tips, gives the Hog Bipe in the words of Big Mike, "Roll rate, Baby"
MDS .68 gives great vertical if not unlimited. Mike says the 68 is the best of the MDS line so far.
Dave Augspurger
Sent in some pics of his
Hog Bipe.
There is going to be a new rule about no pictures with better
covering jobs than my planes ![]()


Power is a Magnum 61, covered in Ultracote.
To quote Dave, " I absolutely love flying it!"
Paul Brabenec - aka
Swooper
With his version of the
Hog Bipe


New cowl and on skis to
boot!
Popular
color scheme ![]()
UPDATE!
Do to the untimely demise of the above plane, Paul has built a second

Paul hails from Victor, ID
Check out more pictures and details of his new plane on his website.
Scott Sellers
Sends us pictures of his
Hog Bipe


Scott says he considers
it his, "Modern Barnstormer.
This one has the ST 75 for power and has plenty of power."
Reelfoot Aeromodlers
out of Union City, TN
- More Pictures -
Hog Bipe Page 2 | Hog Bipe Page 3 | Hog Bipe Page 4 | Hog Bipe Page 5 | Hog Bipe Page 6 | Hog Bipe Page 7
Hog Bipe Tips and Mods
This is a short list of
things a lot of builders have done. The design is very well done
and built stock it flies great, but no matter how great a kit is,
there is always something that
a builder wants to modify to personal taste.
Dual Aileron servos in
the wing - This is
probably the most important, I understand the
new kits call for this. This mod eliminates the surface
flutter some people have experienced. Paper tubes run
through the wing for servo leads make installing or
changing servos a breeze, small 1/2" card board
tubes for rockets work well and are carried by hobby
stores.
Beefing up the landing gear mount - I thought they did pretty well with but sure enough, coming in steep on long grass I ripped it out, some tri stock or better yet some square bass in the corners of the plywood mount for the landing gear wouldn't be overkill.
Moving the Landing gear forward - It can be a handful in tall grass to taxi, full up elevator and 1/2 throttle bursts make it hard to keep the tail down, Some have moved the landing gear forward, I have seen up to a 1/2". This is one that will take some experimentation to see if its worth it or not. * Before moving the gear make sure the landing gear is not reversed!*
Hatch for fuel tank
- Some builders felt it was
very difficult to access the fuel tank after being built,
so they cut a hatch opening on top of fuselage and made a
hatch cover out of balsa and attached with screws.
On mine I just made the front servo rail removable to get
it out if need be.
Reinforcing interplane strut mount points - Paul Brabenec installed blind nuts into the interplane struts, then drilled out the threading. This provides a built in washer and sleeve to protect the light ply strut from wear due to the daily installation and removal of the struts.
Wing Sheeting and Fuse - I thought the wing sheeting was a little soft, I did build it with most of what came, which has held up fine, but I was short one piece of sheeting. I have also heard of some of the sheeting being to narrow.
Mounting the engine sideways - For a more clean, scale like look you can mount the engine at 90 degrees, and build out the front to cowl the engine.
Modifying the Tail and Fuse - As you can see above the rudder and vertical stab are very easily modified to whatever shape strikes your fancy, with negligible effect on flying characteristics. I just cut out a new fin and rudder to resemble a Stearman, and added a 1/4" balsa stringer down the side so it looked more roundish.
More rudder Authority - Instead of making a bigger rudder for better knife edge, modify the elevators to allow more rudder throw. Combined with a high torque servo saves the need of build new parts.
Cowls - A lot of people have asked about cowls.
The one I used I bought second hand at an auction, but I
know places like Stans
FiberTech and Fiberglass specialties sell generic cowls, some with blisters
like on the one at the top. The dimensions I used are -
6" across on the back side, 5 1/2"
would probably fit
5" (or so) up front
3" front opening
5 1/2" long - My engine sticks out
1/2" past the cheek, if yours is shorter a shorter
cowl will work too.
For those who don't like to paint or can't match the covering color, Paul Brabenec has said he has good results with Ultracote used on the Headrest with no warping and minor bubbling that was fixed with pin pricks. He did it in 4 strips.
________
CG and Throws
3 5/8"- to 4
5/8" from the Leading edge of the top wing
Definitely start with the front CG for the first few
flights
Aileron - 5/8"
Elevator - 3/4"
Rudder - 1 1/4"
________
Paul Brabenec has sent in this great idea for a custom stand for the Hog Bipe
For working on the radio installation etc. you need the fuselage upside down. Take about an eighteen inch long piece of 1x8 softwood, plywood, particle board, whatever's laying around. Drill two 3/16 in. holes in it on its lengthwise centerline and 4 1/2 in. on center. Countersink them a bit with a 3/8 in. drill. Screw it onto the cabane assembly and turn the fuselage upside down. Now you can work on the underside of the fuselage very comfortably. I let the tail hang off the end of my bench so it doesn't get scuffed.

Thanks to Ivo Amuli, Paul
Brabenec and others for the tips and suggestions
submitted here.
If anyone has more tips email them to me and I will put them up.
If you have pictures of a Hog Bipe and would like to have them on here, Email me.
Comments or questions?
Send me Email